Leaders Ribalog - ZLR
***********************************************
New in Version 3:
The symbols ribalog has 1 new feature...
Sequential text ... If you check the "Seq." box on the ribalog, the "Top Text" value will be sequentially increased by 1 each time you place a leader. For example, if your "Top Text" is the letter "C" the first leader you place will have the "C" as shown above. The next leader you place however will have "D" as the "Top Text", then "E" and so on. Holding down the "Alt" button will allow you to sequence in a reverse order from the current value, and holding the "Shift" key will keep or "hold" the current value. This feature works both with Numeric and Alpha text. The "Increment" by which this value will be increased in controlled by the "Increment" value in the Sequential Text Ribalog.
*********************************************
This ribalog is designed to allow the placement of special 2 Point and 3 Point Leaders that have "Bubbles" attached to them indicating material and drawing references. This ribalog works closely with the Place Text command. All of the leaders, symbols and text placed by these tools are automatically "scaled" according to the current text height, just like many of the other Scalz tools.
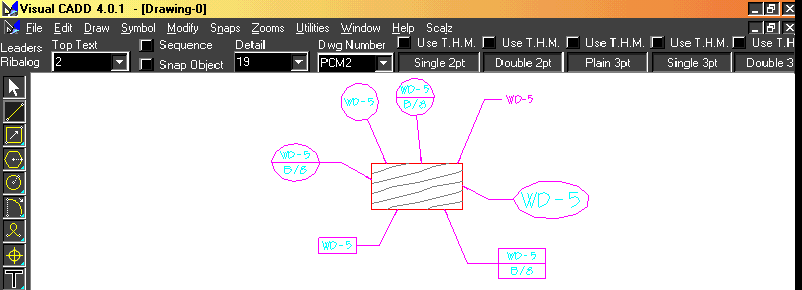
The ribalog allows you to set up and place leaders as shown above. The drop down list boxes on the ribalog are automatically filled with the material and drawing references you specify in your Place Text files. This way your text boxes are always filled in with only the material and drawing references you have created for the project you are currently working on. As a quick note...The 3 Point Leader tools are written so that the symbol placed around the text will automatically increase in "Width" (and only in width) to accommodate the length of the text string you need to place if the text string will not fit in the normal sized symbol.
The "Top Text" list box is filled with the "prefixes" found in a text file, the name of which you supply. The "Detail" list box is filled from a text file called "Details.txt" which is found in you Visual CADD system folder. The "Drawings" list box is filled with a list of the drawing names found in the same folder on your system as the current drawing. This make filling in these leaders very fast and easy and it also helps eliminate typographical errors because you only have to get the references right the first time and Scalz takes care of the rest.
The check boxes found above each of the tool buttons tells each tool whether to use the "Text Height Multiplier" found in the Scalz.ini to increase the height of the text in the Leaders you are going to place. The "Snap Object" check box lets you have the arrow of your leader to automatically "snap" to the closest object when "clicking" the first point of your leader.
In the Scalz.ini you have these settings you can make...
[ScalzLeaders]
TopText=WD-5 Holds the last text found in the Top Text box
DetailText=B Holds the last text found in the Detail box
BottomText=8 Holds the last text found in the Bottom Text box
Radius=.3125 Tells the tools 1/2 the horizontal width of the symbols to be placed
SingleTextHeightMult=2.0 The value to multiply the current text height by when placing Symbols
Font=Architek The font to be used in the leaders
LineSpacing=2.0 The space between the top and bottom lines of text in double leaders
LineColor=10 The Line Color to use when placing leaders
LineWidth=1 The Line Width to use when placing leaders
Layer=2 The Layer you want the leaders placed on
SingleSymbol=Circle The Symbol to use when placing single text line 3 Point Leaders
DoubleSymbol=SplitCircle The Symbol to use when placing double texted line 3 Point Leaders
2PtSymbol=CircleCtr The Symbol to use when placing single text line 2 Point Leaders
2PtDoubleSymbol=SplitCircleCtr The symbol to use when placing double text line 2 Point Leaders
PlaceTextSeperator=: The character looked for in filing the "Top Text" list box (see below)
SourceTextFile=TB1.txt The text file to read for the text to fill the "Top Text" list box
FileNameConvention=2 Specifies the type of files to list in the "Drawings" list box (see below)
Detail_PageSeperator=/ The character placed between "Detail" and "Drawing" reference in 2Pt leaders
Further explanation of a couple of settings...
PlaceTextSeperator=:
This setting tells Scalz what character to look for in the text file, which contains the list of material references. The text found prior to this character in each line of text found in that file will be placed in the "Top Text" list box. Any spaces will be removed from the end of the text strings before they are added to the list.
FileNameConvention=2
Scalz allows you to only list files names that begin with Alpha or Numeric characters. We find this very helpful in that it allows us to name all of our files "Numerically" that we actually want to show up in the lists, and still have "Alpha" tagged files for reference drawings that contain layouts and other miscellaneous drawings. You can choose "0" to only list drawing names beginning with an "Alpha" character, "1" to list only drawings beginning with "Numeric" characters, or "2" to list all files found in the same folder as the current drawing.
SourceTextFile=TB1.txt
This is the file containing all of the material references you would like listed in the "Top Text" list box. If you use the Scalz drawing system to it's fullest, this file can also be a file used to place your material reference using the Place Text tool. For example, if you TB1.txt file contained the following lines of text...
WD-1: 3/4" OAK PLYWOOD STM APPROVED SAMPLE
WD-2: SOLID OAK HARDWOOD STM APPROVED SAMPLE
WD-3: WOOD BLOCKING-MILL OPTION
WD-4: PAINT GRADE POPLAR
...your "TopText" list box would be filled with...
WD-1
WD-2
WD-3
WD-4
...because this is the text found before the ":" in each line of text in the file. You can specify any character you like as a separator, but be careful not to use any character that you might want to show up in your list.
Using the tools is simple. Click any of the 5 buttons and move your cursor to the Visual CADD drawing area. Click the 2 or 3 points to place your leader, and the text will be filled in and the symbol placed for you automatically.
Note that the .vcs symbol files placed with these leaders must reside in the folder specified under the "[Symbols]", "Path" section of the Scalz.ini file. We have supplied both circular and rectangular symbols for your use, but you can create your own. The symbols we have supplied are...
Circle - A 5/8" circle with a "9 o'clock" reference point, used with 3 Pt leaders
CircleCtr - A 5/8" circle with a centred reference point, used with 2 Pt leaders
SplitCircle - A 5/8" circle (9 o'clock Pt) with a horizontal line dividing the top and bottom used with 3 Pt leaders
SplitCircleCtr - A 5/8" (centre Pt) circle with a horizontal line dividing the top and bottom used with 2Pt leaders
Box - A 5/8" wide rectangle with left centre reference point
DblBox - A 5/8" wide rectangle with left centre reference point divided by a horizontal line.
Created using Helpmatic Pro HTML